The Essential Bare Root Planting Guide
In the vibrant world of gardening, the term “bare root” might evoke a sense of simplicity, a return to the roots, quite literally. But what does it mean to deal with bare root plants, and why is it becoming a focal point in sustainable gardening practices today?
Bare root planting offers a sustainable and economical approach to nurturing and transplanting plants, whether for personal enjoyment or for sale. As you venture into the world of bare root planting, envision a garden thriving with plants nurtured from scratch, ready to find new homes or to be transplanted into different areas of your garden.
⚠️ Warning: If you are considering selling bare root plants, it is essential to consult and adhere to your local and national laws and regulations governing the sale of plants. Ensuring compliance will help you conduct your business ethically and avoid potential legal complications.
Fast forward to today, and we witness a resurgence in the popularity of bare root propagation. Modern gardeners are rediscovering the manifold benefits of this age-old practice, embracing it not just for its cost-effectiveness but also for the opportunities it offers in fostering stronger, healthier plants. It stands as a testament to the gardening community’s continual evolution, adapting and adopting practices that echo with sustainability and a deeper connection to the earth.
As we delve deeper into this topic, we invite both seasoned gardeners and budding enthusiasts to explore the nuances of setting up a bare root nursery. Whether you are looking to propagate plants you’ve nurtured before or venturing into uncharted territories with new species, this guide promises to be your steadfast companion.
Setting Up Your Bare Root Nursery
Choosing the Right Site
Embarking on the journey of setting up a bare root nursery begins with choosing the right site. This step is pivotal, as the site you select will play a crucial role in determining the health and success of your plants. Let’s break down the essential factors to consider:
Soil Profile and Type
Understanding the soil profile and type in your chosen site is the cornerstone of setting up a successful nursery. Different plants have varying preferences when it comes to soil; hence, it is vital to be well-acquainted with the soil’s physical and chemical properties.
- Texture: The soil texture, which refers to the proportion of sand, silt, and clay present, influences water retention and drainage. Loamy soil, a balanced mixture of these components, is often considered ideal.
- Structure: Soil structure affects root penetration and water movement. Well-structured soil allows for good aeration and drainage, promoting healthy root growth.
- Nutrient Content: Conduct a soil test to determine the nutrient content. This will guide you in amending the soil appropriately to provide the necessary nutrients for your plants.
- pH Level: The soil pH affects nutrient availability. Most plants prefer a pH range of 6.0 to 7.0, although specific plants may have different preferences.
Drainage and Aeration
A well-drained site prevents waterlogging, which can lead to root rot and other diseases. Consider the following:
- Slope: A gentle slope can aid in drainage, preventing water from accumulating in one area.
- Soil Percolation Test: Conduct a soil percolation test to understand how quickly water drains through the soil. This will help you identify areas that may need amendments to improve drainage.
- Aeration: Ensure the soil is well-aerated to facilitate the exchange of gases between the soil and the atmosphere, promoting healthy root development.
Understanding Soil Percolation Tests with Experts
To give you a practical understanding of how a soil percolation test is conducted, we have sourced a detailed demonstration by experts from Cornell SIPS (School of Integrative Plant Science). In this video, Zac Rood from the Department of Landscape Architecture and Nina Bassuk, the Director of the Urban Horticulture Institute, walk you through the process of conducting a percolation test, offering invaluable insights and tips to get it right.
Watch the video to grasp the nuances of a percolation test and to understand how it can help you in determining the suitability of your soil for bare root planting
pH Levels and Nutrient Testing
Before you plant, it’s wise to conduct a soil test to determine the pH levels and nutrient availability in your soil. Here’s how you can go about it:
- Soil Testing Kits: Utilize soil testing kits available in the market to get a preliminary understanding of your soil’s pH and nutrient levels.
- Professional Soil Testing: For a more detailed analysis, consider sending soil samples to a professional soil testing laboratory.
- Amendments: Based on the soil test results, you might need to add amendments to optimize the soil conditions for your bare root plants.
Preparing the Field for Planting
Once you have a clear understanding of the soil profile, it’s time to roll up your sleeves and prepare the field for planting. Here’s a step-by-step guide:
- Clear the Area: Begin by clearing the area of weeds, debris, and any other unwanted materials.
- Soil Tillage: Till the soil to a depth of 12-15 inches (30-38 cm) to loosen it, enhancing root penetration and water infiltration.
- Soil Amendments: Based on the soil test results, add the necessary soil amendments to improve soil structure and fertility.
- Bed Formation: Create raised beds or rows to facilitate drainage and make it easier to manage the plants.
- Pathways: Establish pathways between the beds or rows for easy access during maintenance and harvesting.
- Irrigation System: Set up an irrigation system to ensure a consistent water supply for your plants.
Irrigation System
Water is the lifeblood of any nursery, and setting up a well-planned irrigation system is non-negotiable. Let’s delve into the considerations and options available:
- Drip Irrigation: This system delivers water directly to the base of each plant, reducing water wastage and preventing the spread of waterborne diseases.
- Sprinkler Irrigation: Suitable for large nurseries, this system can cover a large area, providing even water distribution.
- Manual Watering: If you are setting up a small nursery, manual watering using hoses or watering cans might be sufficient.
- Water Source: Consider the source of water; it should be clean and free from harmful chemicals and pathogens.
- Water Conservation: Explore water conservation techniques such as mulching and rainwater harvesting to use water more efficiently.
Weed Control
Weeds are the uninvited guests in any garden, competing with your plants for nutrients, water, and sunlight. Here’s how you can keep them at bay:
- Pre-Planting Weed Control: Before planting, remove existing weeds from the site to give your plants a weed-free start.
- Mulching: Mulching not only conserves moisture but also suppresses weed growth by blocking sunlight.
- Hand Weeding: Regular hand weeding can help maintain a weed-free nursery, promoting healthy plant growth.
- Herbicides: In large nurseries, you might consider using herbicides as a last resort, but always opt for eco-friendly options to maintain soil health. I would personally never use herbicides.
Soil Amendment
Soil amendment is akin to laying a strong foundation for a building; it sets the stage for healthy plant growth, ensuring your plants have a nourishing environment to thrive in. Let’s explore the different facets of soil amendment:
Benefits of Adding Organic Matter to the Soil
Organic matter is the cornerstone of a fertile soil, offering a plethora of benefits that enhance the soil structure and, consequently, plant health. Here’s why it is indispensable:
- Soil Structure: Organic matter improves soil structure, promoting better water infiltration and retention, and facilitating root penetration.
- Nutrient Supply: It acts as a reservoir of nutrients, slowly releasing them to the plants, ensuring a steady supply over time.
- Microbial Activity: Organic matter fosters microbial activity, enhancing soil fertility through the breakdown of organic compounds into nutrients that plants can absorb.
How to Incorporate Organic Matter Effectively
Adding organic matter to the soil is not just about quantity but also the method of incorporation. Here’s a guide to doing it right:
- Composting: Create a compost pile with garden waste, kitchen scraps, and other organic materials. Once decomposed, incorporate it into the soil to enrich it with nutrients.
- Cover Crops: Planting cover crops like legumes can help in fixing nitrogen in the soil, improving its fertility.
- Mulching: Applying a layer of organic mulch not only conserves moisture but also adds organic matter to the soil as it decomposes.
- Timing: Incorporate organic matter into the soil well before planting to allow it time to decompose and enrich the soil.
The Impact of Organic Matter on Root Development
A well-amended soil with a rich organic matter content can significantly influence root development. Let’s delve into the specifics:
- Root Expansion: Organic matter loosens the soil, allowing roots to expand more freely and access nutrients from a larger soil volume.
- Root Health: Healthy soil fosters healthy roots, which are less susceptible to diseases and pests.
- Root Resilience: Plants grown in well-amended soil tend to be more resilient, with roots capable of withstanding adverse conditions better.
Planting Density
After soil amendment, the next step is to decide on the planting density, a critical factor that influences not only the growth of individual plants but also the overall yield of your nursery. Let’s break it down:
Determining the Right Spacing for Different Plants
Different plants have different spacing requirements, influenced by their growth habits and root systems. Here’s how to get it right:
- Research: Research the spacing requirements for the specific plants you intend to grow in your nursery.
- Growth Habit: Consider the growth habit of the plants; some plants spread out more than others and require more space.
- Root System: Understanding the root system of the plants can help in determining the appropriate spacing to facilitate healthy root development.
Strategies for Increasing Planting Density
Increasing planting density can help in maximizing the yield from your nursery. Here are some strategies to consider:
- Interplanting: This involves planting different crops close to each other, utilizing the space more efficiently.
- Vertical Gardening: Employ vertical gardening techniques to grow plants upward, saving ground space.
- Succession Planting: This strategy involves planting crops in succession, utilizing the space continuously throughout the growing season.
Considerations for Market Strategy and Plant Growth
When deciding on the planting density, it is essential to balance market strategy and plant growth considerations. Here are some points to ponder:
- Market Demand: Consider the market demand for the plants you are growing. It might be beneficial to allocate more space to high-demand plants.
- Quality vs. Quantity: Striking the right balance between quality and quantity is crucial. Overcrowding can lead to a decline in quality, while too much spacing can reduce the yield.
- Ease of Harvest: Consider the ease of harvest; adequate spacing can facilitate easier harvesting, reducing labor costs and time.
Harvesting Bare Root Plants
Harvesting is a pivotal moment in the life cycle of your bare root nursery. It’s the time when your nurtured plants are ready to be relocated, either for sale or for transplanting to a new home. Let’s delve into the techniques and considerations that ensure a successful harvest:
Techniques for Harvesting Bare Root Plants
Harvesting bare root plants involves a series of steps, each critical to ensuring the health and viability of the plants. Here’s a detailed walkthrough:
- Timing: The ideal time for harvesting bare root plants is during their dormancy period, generally in late fall or early spring. This timing reduces transplant shock and promotes successful establishment in the new location.
- Soil Preparation: Before harvesting, prepare the soil by watering it adequately to facilitate easy removal of the plants without damaging the roots.
- Root Pruning: In the season before harvesting, consider root pruning to encourage the development of a compact root system, which will be easier to transplant.
Tools Used in Harvesting
Having the right tools at your disposal can make the harvesting process smoother and more efficient. Here are the tools you might need:
- Spades and Shovels: These are essential for digging out the plants without damaging the roots.
- Root Pruners: Specialized root pruners can be used for cutting through thicker roots cleanly, preventing diseases and pest infestation.
- Gloves: Protective gloves will ensure safety while handling plants with thorns or rough bark.
Timing of Harvest: Seasonal Insights
Different plants have different seasonal preferences when it comes to harvesting. Here’s a deeper look:
- Fall Harvest: Many plants prefer fall harvesting, as it allows them to establish roots in the new location before the onset of winter.
- Spring Harvest: Spring is the season of growth, making it an ideal time for transplanting many plants, giving them a full growing season to establish.
- Weather Considerations: Always consider the weather forecast; avoid harvesting just before a frost or a heatwave to prevent transplant shock.
Post-Harvest Handling
Once the plants are harvested, the journey isn’t over. Proper post-harvest handling is crucial to maintain the quality of the bare root plants. Let’s explore the necessary steps:
Pruning Bare Root Seedlings
Pruning is an essential step post-harvest. Here’s how to go about it:
- Root Pruning: Prune damaged or excessively long roots to facilitate easier planting and encourage new root growth.
- Top Pruning: Prune the top growth to balance with the root system, promoting a healthier plant.
- Disease Prevention: Pruning cuts should be clean to prevent the entry of diseases; always use sharp and sterilized pruning tools.
Handling of Roots During Pruning
Handling the roots with care during pruning is vital to prevent damage. Here’s what you need to know:
- Gentle Handling: Handle the roots gently to prevent bruising and damage, which can lead to diseases and pest infestation.
- Hydration: Keep the roots hydrated during the pruning process to prevent drying out, which can reduce viability.
- Immediate Planting: If possible, plant the pruned plants immediately to reduce stress and promote successful establishment.
Transplantation of Bare Root Plants
Transplantation is the next critical step. Here’s a guide to successful transplantation:
- Transportation: Ensure safe transportation to the new location, protecting the plants from wind and sun to prevent drying out.
- Planting Hole: Prepare a planting hole that is wide and deep enough to accommodate the root system without crowding.
- Soil Contact: Ensure good soil contact with the roots to facilitate water and nutrient uptake, avoiding air pockets that can dry out the roots.
Storage Before Planting
In some cases, you might need to store the plants before planting. Here’s how to do it right:
- Cool Storage: Store the plants in a cool place with a temperature between 34° to 38° F (1° to 3.3° C) to maintain dormancy.
- Moisture: Maintain adequate moisture levels to prevent the roots from drying out; wrapping the roots in damp peat moss or newspaper can help.
- Short-Term Storage: For short-term storage, a cool and dark place like a garage or basement can suffice, but ensure the roots remain moist.
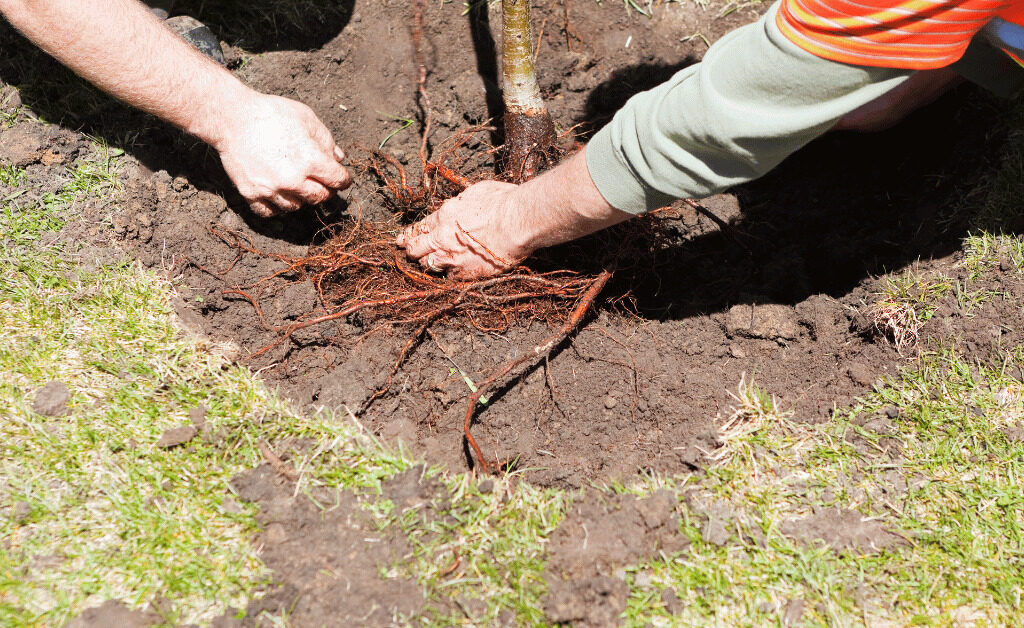
Planting Bare Root Plants
Planting bare root plants is a meticulous process that demands attention to detail. It is the phase where your nurtured plants finally take root in their new homes, be it in another part of your garden or in a customer’s yard. Let’s walk through the step-by-step guide to planting bare root plants:

Step-by-Step Guide to Planting
Planting bare root plants correctly is pivotal to their survival and growth. Here is a detailed guide to help you get it right:
- Preparation of Planting Site: Before you bring the plants to the site, ensure it is well-prepared with loosened soil, free of weeds and debris.
- Soaking the Roots: Before planting, soak the roots in water for 1-2 hours to hydrate them, but avoid soaking for extended periods as it can lead to root rot.
- Digging the Hole: Dig a hole that is wide and deep enough to accommodate the root system without crowding or bending the roots.
- Positioning the Plant: Place the plant in the hole at the right depth, ensuring that the crown of the plant is at soil level.
- Backfilling: Backfill the hole with soil, gently firming it down to eliminate air pockets and ensure good soil contact with the roots.
- Watering: Water the plant thoroughly after planting to settle the soil and establish good contact between the soil and roots.
- Mulching: Apply a layer of organic mulch around the plant to conserve moisture and suppress weed growth.
Tips for Successful Planting
To enhance the success rate of your planting, here are some expert insights:
- Root Inspection: Before planting, inspect the roots and remove any damaged or diseased roots to prevent issues down the line.
- Plant Orientation: Pay attention to the plant’s orientation; some plants have a preferred direction of growth, and aligning them correctly can promote healthy growth.
- Planting Depth: Ensure the planting depth is correct; planting too deep or too shallow can lead to problems like stem rot or drought stress.
Watering and Mulching Post-Planting
After planting, the care you provide in the initial weeks is critical. Here’s how to go about watering and mulching:
- Watering Schedule: Establish a regular watering schedule to ensure the plants receive adequate moisture, especially in the initial weeks post-planting.
- Mulch Type: Choose the right type of mulch; organic mulches like straw, leaves, or bark are preferred as they add organic matter to the soil as they decompose.
- Mulch Thickness: Apply a 2-3 inch (5-7.6 cm) thick layer of mulch to effectively suppress weeds and conserve soil moisture.
Nurturing Your Bare Root Plants to Maturity
After the meticulous process of planting, it’s time to nurture your bare root plants to maturity. This phase is all about providing the right care and environment for your plants to flourish. Let’s explore the various aspects of nurturing your plants to maturity:
Monitoring Growth and Development
Keeping a close eye on the growth and development of your plants is essential. Here’s how you can do it:
- Growth Diary: Maintain a growth diary to record the development of your plants, noting down any significant changes or observations.
- Photographic Records: Take periodic photographs to visually track the growth and development of your plants.
- Growth Milestones: Be aware of the growth milestones for different plants to ensure they are developing as expected.
Pest and Disease Management
A critical aspect of nurturing plants to maturity is managing pests and diseases effectively. Here’s a guide to help you:
- Regular Inspections: Conduct regular inspections to identify any signs of pest infestation or disease early on.
- Integrated Pest Management (IPM): Adopt an IPM approach, which combines various strategies to manage pests in an environmentally friendly manner.
- Natural Predators: Encourage natural predators like birds and beneficial insects to control pest populations naturally.
Nutrient Management
Ensuring your plants receive the right nutrients is pivotal to their growth and development. Here’s how to manage nutrients effectively:
- Soil Testing: Conduct soil tests periodically to monitor the nutrient levels in the soil and amend it accordingly.
- Organic Fertilizers: Preferably use organic fertilizers to nourish your plants, as they release nutrients slowly and improve soil health.
- Compost Tea: Consider using compost tea, a nutrient-rich liquid made from compost, to provide a quick nutrient boost to your plants.
Water Management
Water is the lifeblood of plants, and managing it effectively is crucial. Here’s a guide to water management:
- Irrigation System: Ensure your irrigation system is functioning correctly, providing uniform water distribution without any wastage.
- Water Conservation: Adopt water conservation practices like mulching and rainwater harvesting to use water more efficiently.
- Moisture Monitoring: Monitor soil moisture levels to avoid overwatering or underwatering, both of which can harm your plants.
Pruning and Training
As your plants grow, they will require pruning and training to develop correctly. Here’s how to go about it:
- Pruning: Learn the correct pruning techniques for different plants to encourage healthy growth and prevent diseases.
- Training: Train plants, especially climbers and sprawlers, using supports to guide their growth in the desired direction.
- Seasonal Pruning: Be aware of the best seasons for pruning different plants to avoid causing stress or harm to the plants.
Bringing Your Plants to Market and Transplantation
As your bare root plants reach maturity, it’s time to think about the next steps: bringing them to market or transplanting them into a more permanent location. This stage is equally exciting and rewarding, witnessing the fruits of your labor come to full bloom. Let’s delve into the strategies and considerations for this phase:
Preparing Plants for the Market
If you are planning to sell your plants, preparation is key. Here are the steps and considerations to ensure your plants are market-ready:
- Presentation: Ensure your plants look healthy and vibrant, with well-pruned branches and roots, ready to catch a buyer’s eye.
- Packaging: Consider eco-friendly packaging options that protect the plants while showcasing your commitment to sustainability.
- Information Tags: Attach information tags to each plant, providing details about the species, care instructions, and potential growth size to inform and assist buyers.
- Pricing: Set competitive pricing based on market research, considering factors like the rarity of the plant species and the care you’ve invested in nurturing them.
Transplantation into a Permanent Location
If you are transplanting the plants into a more permanent location in your garden, here are the steps to ensure successful transplantation:
- Site Preparation: Prepare the transplantation site well in advance, ensuring it meets the specific needs of the plants in terms of soil type, sunlight, and water availability.
- Transplanting Technique: Use proper transplanting techniques to minimize stress on the plants, ensuring a smooth transition to their new home.
- Post-Transplant Care: Provide attentive post-transplant care, including regular watering and protection from pests and diseases, to help the plants establish successfully.
Marketing Strategies for Selling Your Plants
If you are bringing your plants to market, having a robust marketing strategy can enhance your success. Here are some strategies to consider:
- Online Marketing: Leverage online platforms to reach a wider audience, showcasing your plants through a well-designed website and social media platforms.
- Community Engagement: Engage with the local community through workshops and garden tours, building a loyal customer base through personal connections.
- Collaborations: Collaborate with local nurseries and garden centers to reach more customers and build a reputation in the gardening community.
Tips for Successful Transplantation
For those looking to transplant their plants successfully, here are some tips to guide you:
- Seasonal Considerations: Consider the best season for transplanting specific plants to ensure they establish well in their new location.
- Soil Amendments: Before transplanting, amend the soil in the new location to meet the specific needs of the plants, enhancing their chances of successful establishment.
- Watering Regime: Establish a regular watering regime post-transplantation to help the plants settle in and grow successfully.
Conclusion: The Rewarding Journey of Bare Root Planting
As we come to the end of this extensive guide, it is evident that the journey of bare root planting is a rewarding endeavor, steeped in the joy of nurturing life from its nascent stages to full bloom. Whether you are looking to bring vibrant plants to market or enhance your garden with home-grown beauties, the world of bare root plants offers a fulfilling pathway to achieve your goals. Let’s recap the vital stages and the joy that awaits at each step:
The Joy of Nurturing from Scratch
Starting with soil amendment and planting density, you have the privilege to nurture plants from scratch, providing them with a nurturing ground rich in nutrients and precisely spaced to facilitate optimal growth. It is a phase where you lay the foundation for a successful nursery, a place where life begins and thrives.
Witnessing the Growth and Development
As you move to the nurturing phase, the joy multiplies as you witness the growth and development of your plants. It is a period of attentive care, where you foster growth through effective pest and disease management, nutrient, and water management. The joy of seeing your plants grow and flourish is indeed unparalleled.
The Fulfillment of Harvesting and Transplantation
Then comes the fulfilling phase of harvesting and transplantation, where you reap the rewards of your hard work. It is a time of careful extraction and preparation, ensuring your plants are ready to grace new homes or markets with their vibrant presence.
The Final Reward: A Vibrant Garden or a Successful Sale
Finally, as you bring your plants to market or transplant them into a permanent location, the rewards are manifold. Be it the satisfaction of a successful sale or the joy of seeing your garden adorned with plants nurtured by your own hands, the final reward is indeed gratifying.
Embarking on a New Journey
As one journey ends, another begins. With the knowledge and experience gained, you are now equipped to embark on a new journey, perhaps with new plant species or innovative gardening techniques, continuously evolving and growing in the dynamic world of gardening.
Further Reading: Stabilize Your Landscape with the Right Plants
As you venture into the enriching journey of bare root planting, understanding the broader spectrum of plant utility can be a game-changer. Whether you are transplanting your nurtured plants into a permanent location or strategizing the layout of your garden, considering erosion control can be pivotal.
We invite you to explore our detailed guide on Plants for Erosion Control: Stabilizing Your Landscape. In this article, you will discover a range of plants that not only add beauty to your garden but also serve a functional role in stabilizing the soil, preventing erosion, and fostering a healthy ecosystem. Dive deep into the world of sustainable gardening and unlock the secrets to a garden that is both beautiful and environmentally resilient. Enhance your gardening journey with knowledge that empowers you to create a landscape that stands the test of time, nurturing not just plants, but the very ground they grow in.